Third Light Backup Server requires a licence key and support and maintenance. It is required for every Data Center Edition deployment. Please [email protected] if you need a license.
Introduction
Your Third Light Chorus server is designed to operate in a pair, with a master and a replica. To make proper use of this feature, two separate servers are required. The servers are usually in distinct locations. Replications between the servers occurs over an SSH (encrypted, compressed) network connection, and is suitable for use over public internet connections, for example.

- The Primary Server is your main, production hardware running your Third Light Chorus system.
- The Backup Server is the additional backup or mirror server which replicates from the Primary Server.
In the event of a disaster, a web interface on the Backup Server provides a single push-button process to activate the server (make it live). At this stage, all synchronisation is stopped and the two servers are disconnected from each other, to prevent any problems.
The Backup Server requires its own license key.
A web-based administration tool is provided on the Backup Server, allowing you to configure the master-slave cluster, check that synchronisation is active, and, if required, to make the Backup Server into a production system.
The Backup Server is generally of a slightly greater capacity (at least 10% larger) than the Primary Server, but lower CPU/memory specification as it is not used by users in normal operation.
The installation and configuration required is discussed, next.
After a disaster has occurred and the Backup Server is live, you may wish to later switch back (for example, after repairs or replacement have taken place).
In this case, the recovery procedure is to install the Backup Server packages on the old Primary Server (in effect, reversing the roles of the two servers). Then, following the same process of using the push-button process to activate the server, the roles are reversed. For maximum safety and reassurance we recommend involving Third Light Support where time permits.
Configuring the Backup Server
For simplicity, we will assume the host name of the Primary Server is chorus-primary and the host name of the Backup Server is chorus-secondary. You should substitute the hostnames or IP addresses of servers where chorus-primary and chorus-secondary are mentioned.
Before you start, ensure that Chorus has been installed on the Primary Server (by following the installation guide PDF supplied with your purchase). You will need the following details from that installation:
- The root password for the Primary Server
- The hostname or IP address of the Primary Server
The Backup Server must be able to reach chorus-primary on TCP port 22, SSH.
Next, install the Chorus software onto the Backup Server in the same way that you installed the Primary Server.
- The initial installation process is identical to installing a Primary Server, and is described in the Third Light Installation Guide (PDF). This is available by emailing [email protected] if you have misplaced your copy.
- The Backup Server can be added at any time provided the details for the Primary Server, above, are known.
- No interaction with the Primary Server is required as all configuration is managed via the Backup Server's own user interface.
- When you are installing the Backup Server, you will need a unique license username and password. Do not enter the same license details as the Primary Server.
- The Backup Server will have its own hostname, IP address and passwords. You will need to keep a record of these.
- All other settings requested during the installation of Chorus are the same as you entered for the Primary Server.
- When you have completed the standard installation of the Third Light software to your Backup Server, you will be able to login as the root user. You can do this interactively via a local console, or by using SSH and using the username "root".
Important: check that you are logged into the Backup Server (chorus-secondary), not the Primary Server (chorus-primary). You do not need to login to the Primary Server to complete this installation, and should never install chorus-sync on the Primary Server. It is only needed on the Backup Server.
After logging into the Backup Server, run these commands:
apt-get update
apt-get install ims-sync
Follow the prompts to install the packages for ims7-sync. A number of dependencies will also be installed.
Exim provides local SMTP outbound mail handling for your server. Next, configure the mail transport agent (Exim) so that any email alerts from the server can be delivered:
dpkg-reconfigure exim4-config
Once the package has been installed and Exim is conifgured, reboot and then you can configure the Backup Server via its user interface. You can do this by logging into the built-in web server.
Logging into the Backup Server
Using your web browser, navigate to https://chorus-secondary:8443.
Please note that you will need to specify HTTPS in the address bar, as this is a non-standard port, and you may need to accept HTTPS (SSL) certificate warnings in order to open this page as a self-signed certificate is used. If you have not installed the ims-sync package (see above) then no response will be received.
If you have previously configured the Backup Server, you will see a login screen. Enter your Backup Server license username, and then enter the password. If you do not have these details, please contact [email protected].
If you have not previously configured the Backup Server, you will reach the initial configuration form, as follows:
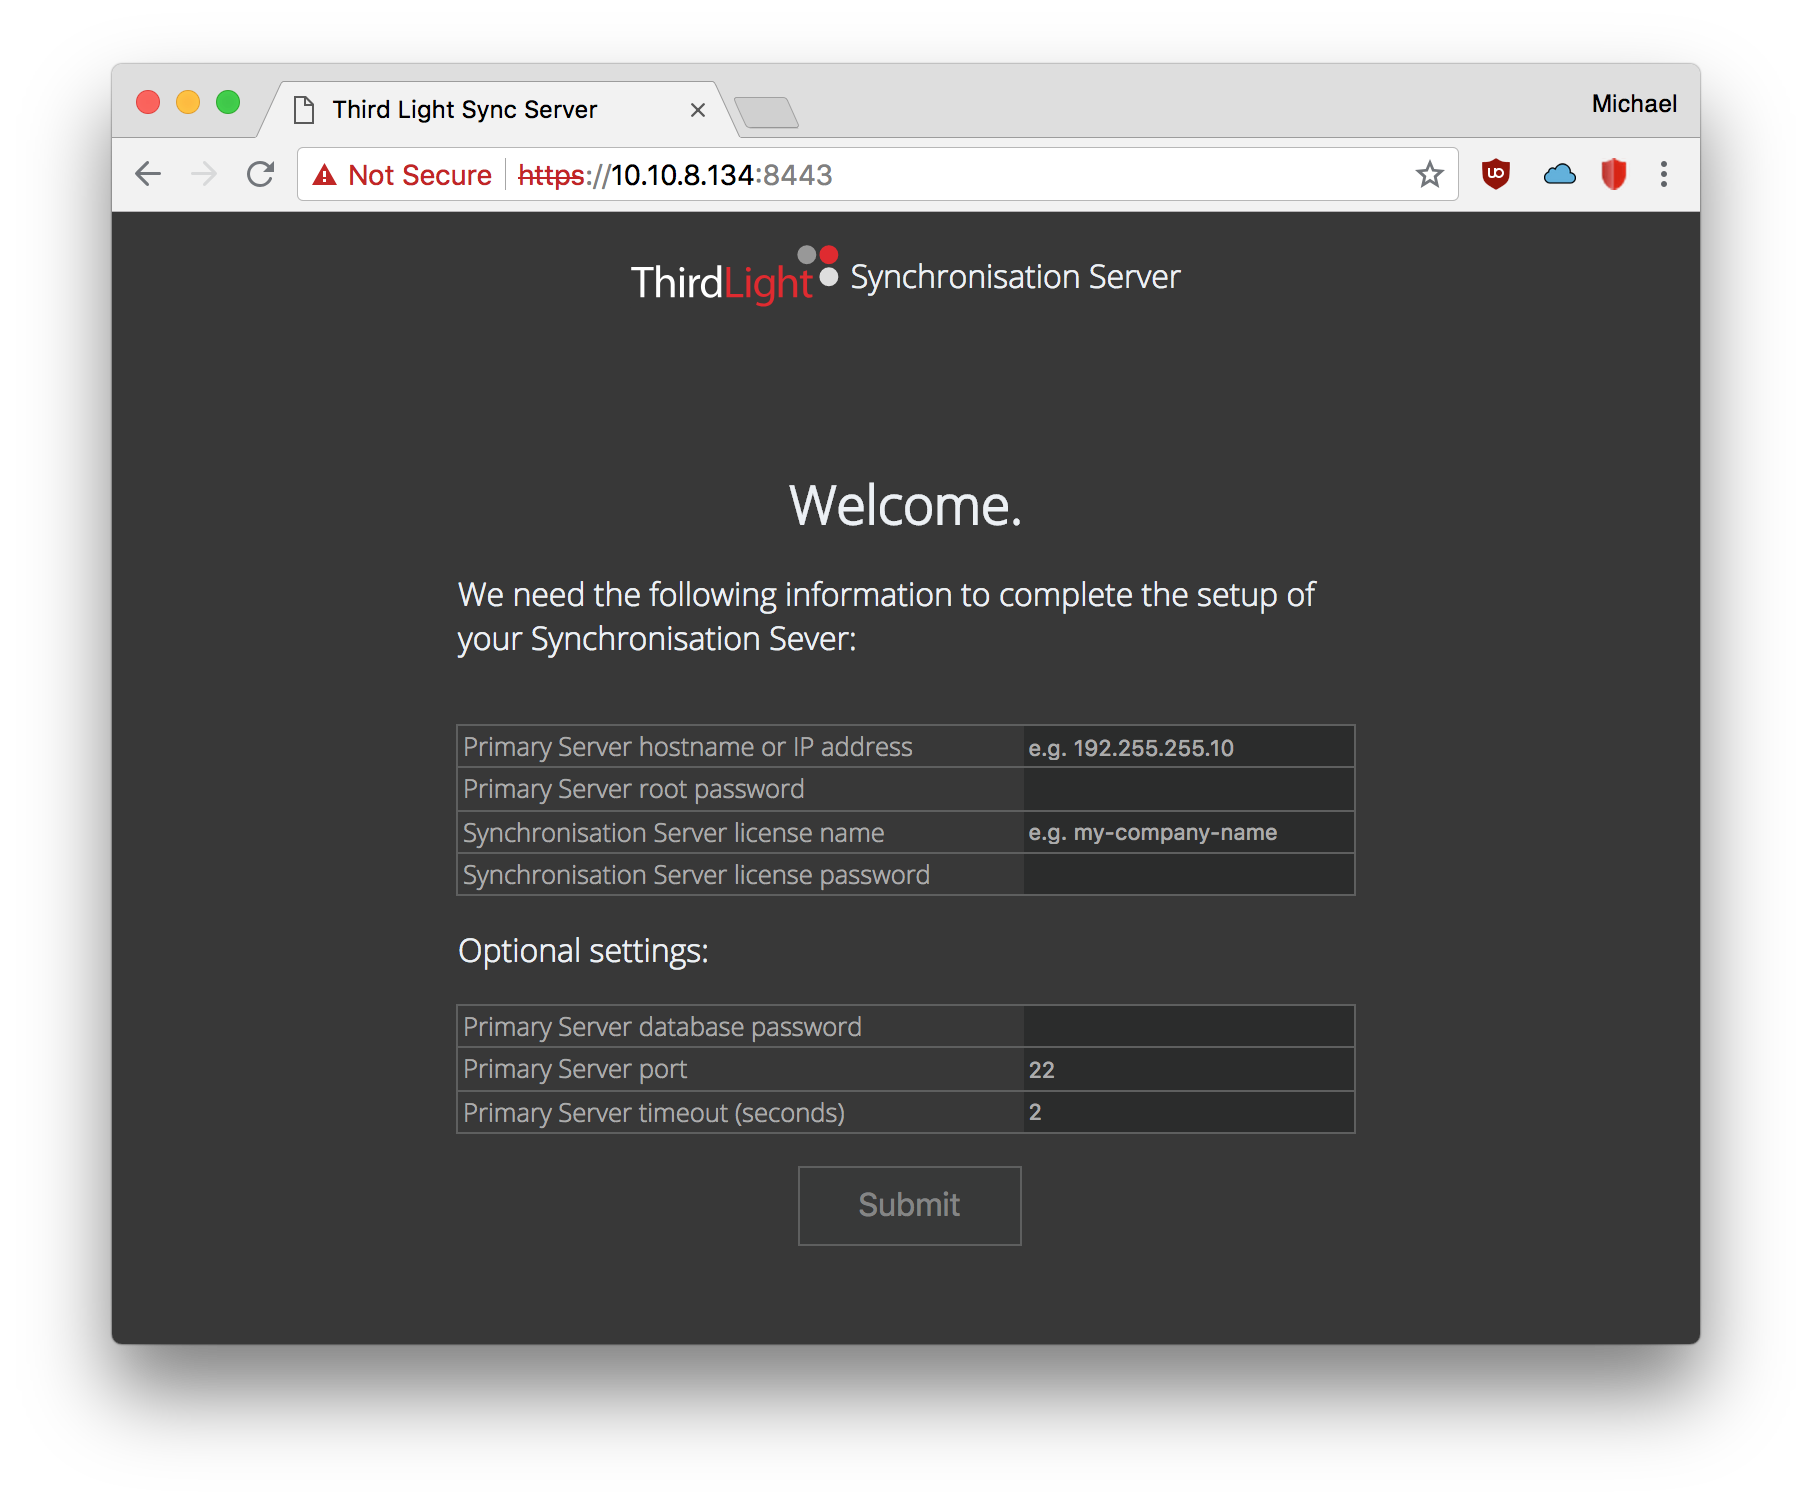
Enter the following information to complete the form:
- Primary Server hostname or IP address: enter the address of your Primary Server. This must be reachable via TCP/IP from the Backup Server (ports 22, 80 and 443 are used).
- Primary Server root password: the root password you set in the installation process.
- Backup Server license name: the username of your Third Light Backup license key. Take care - please do not enter the license of the Primary Server. If you do not have this information, please contact [email protected].
- Backup Server license password: the password for your license key.
The optional settings are normally correct and should not need changing unless you have specifically changed the SSH port number or require a longer timeout. Otherwise, enter port 22 and a timeout of 2 seconds, then click "Submit".
The Primary server database password is blank by default. Only enter a password here if you know that one is required to authenticate with the MySQL root user account.
If all of the settings are correct, you will reach the main Backup Server user interface, otherwise an error message will be displayed to help you.
Using the Backup Server web interface
Configuration tab
The Configuration tab contains all of the settings for your server, and must be correctly setup before your first backup will successfully transfer from the Primary Server.
The only settings that must be set are the Global Settings. You do not normally need to edit any Advanced Settings.
Configuration: Global Settings
| Setting label | Description |
|---|---|
| Enabled | Runs daily via Cron, or when manually initiated. Disabled when the server is in production use. |
| Maximum Generations | Keep roll-back data for this number of days. Typically allow 0.5% storage overhead per day, although in delete-heavy environments this can be much larger |
| Primary Server IP address or hostname | The hostname (or IP address) of the Primary Server to back up. |
| Database: MySQL root Password | If you have configured a root account password for MySQL on the primary server, it is needed here to import the database. This value is normally blank. |
| Notify: Error E-Mail Address | If an error occurs during backup, send a notification to this address |
Configuration: Advanced Settings
Do not change Advanced Settings unless you are certain that the setting is required. No changes are required on this panel to make the server work as designed.
| Setting label | Description |
|---|---|
| Directory Settings | |
| Additional Datastores | By default, just /space will be backed up. If you have additional datastores (/space2, /space3,...) on the primary server, enter them here, in the format "space2 space3" |
| Roll-Back Path | The directory to store roll-back data for the main content store. You may wish to change this if you have a dedicated mount point for roll-back data |
| Database Archive Path | The directory to store old snapshots of the database. You may wish to change this if you have a dedicated mount point for roll-back data |
| Database Snapshot Path | The directory on the Primary Server where database snapshots are made by hotcopy. It is normally only necessary to change this if the company name was configured differently on the Primary Server and the Backup Server during installation |
| Date Format | Rollback data and databases are stored in directories named according to this, in GNU date format (see https://www.gnu.org/software/coreutils/manual/html_node/Examples-of-date.html) |
| Additional Directories | If you need to back up directories other than ims, archives or uploads from within each /space directory, specify them here. For example, to back up /space/flatcopy specify "flatcopy" |
| Sync event reporting key path | The Backup Server registers a key with the Primary Server to allow it to report backup progress. It is stored in the specified file. |
| Global Settings | |
| PID File | The backup process stores its process ID in a file to allow monitoring and to protect against concurrent runs |
| Assume storage appliance replication | If you have a replicating pair of filers, such that the /space<n> mounts on this server have content that implicitly mirrors that on the Primary Server, enable this option. In this event, the Backup Server only considers database and application state, and will not perform any bulk data transfer. Do not enable this option if you do not have a mirroring solution. |
| Network | |
| SSH Port | If you have SSH running, or forwarded from, a non-default port, specify it here |
| Disable Ping Diagnostic | The Backup Server pings the Primary Server as an initial test of its availability. If your network environment blocks ICMP ping then you will need to select this option to bypass that check. |
| Bandwidth Limit | During network copy operations, limit data transfer to the specified rate, in kBps (not kbps). Leave empty to use max available bandwidth |
| Use Transfer Compression | If enabled, network copies use GZIP compression. Typically this is not a useful optimisation, since most modern file formats include internal compression, so the achievable reduction in bandwidth is small compared with the CPU overhead |
| Copy Retries | The number of times to retry a copy if the network connection is dropped |
| rsync Arguments | For advanced users, you can modify the rsync flags used by the data transfer (see https://download.samba.org/pub/rsync/rsync.html) |
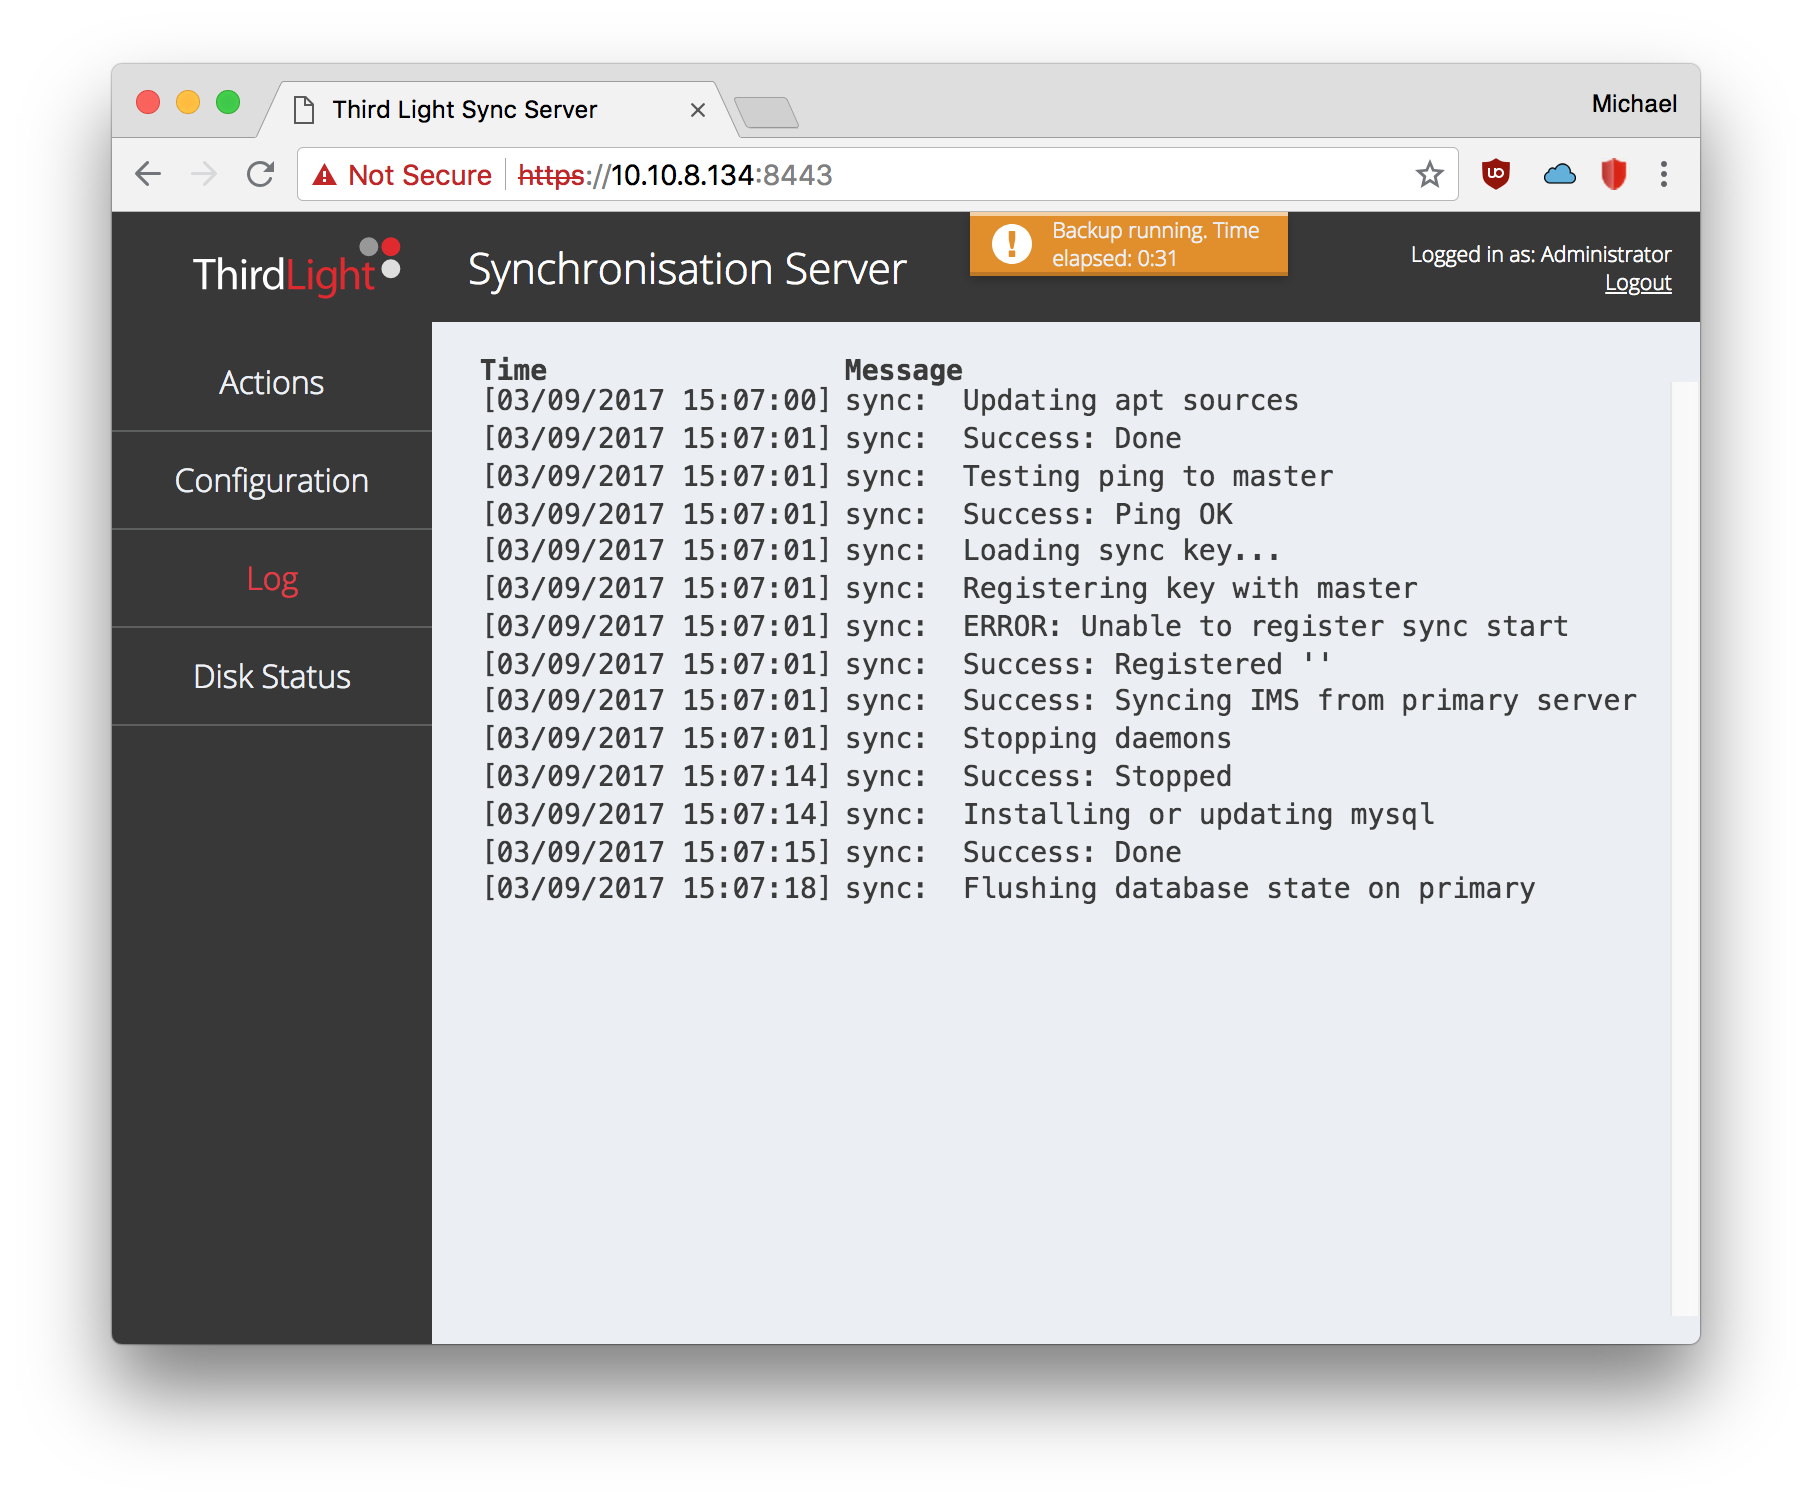
Log tab
The Log tab contains a condensed or abridged record of actions taken (excluding low-level debugging information). For example, it will show when an action starts and when it succeeds, as well as logging any failures. The contents of this log are emailed to the "Notify" address on the Configuration tab in the event of any errors.
For low-level logs, go to the Actions tab and look under "Actions Log". This information can be cut-and-pasted to Third Light in a support ticket and will expedite your ticket being resolved in most cases.
Actions tab
Actions: Triggering a manual backup to the Backup Server
Click the button labelled "Start a new backup", and provided a backup is not already in progress, the Backup Server will immediately begin the process of connecting to the Primary Server to create a new backup. When the backup is complete, a green banner will be displayed at the top of your browser view to indicate that the backup succeeded. If you see any error messages instead, go to the "Log" tab or the "Actions Log" on the Actions tab to see more details.

Actions: Failing over over to the Backup Server
Clicking the button labelled "Emergency Activation: Make the Backup Server live now" will stop the Backup Server, and convert it to a production Third Light Chorus server based on the last backup and database replica copied from the Primary Server. You can login to the server by accessing it as https://chorus-secondary (HTTPS is used).
You can also update your DNS servers to point the production hostname of the Primary Server to the Backup Server, which is normally needed to ensure that users reach the correct IP address and do not see HTTPS certificate warnings.
Actions: The Actions Log
When the Backup Server is busy completing a backup or becoming active, you can see what the low-level operations are by looking at the Actions Log on the Actions tab. In the event of any problems, error messages or other complications arising you can supply the contents of this log to Third Light support at [email protected], in order to facilitate a swift resolution of any issues.
Disk Status tab
The Disk Status tab shows a report of the storage available on both the Primary Server and the Backup Server. It is essential that the Backup Server has at least the same amount of disk space as the Primary Server, and ideally, a further margin of storage to allow for daily roll-backs. 0.5% of storage per day is recommended as a typical margin. For example, if a 28-day roll-back window is desirable and the Primary Server has 1000GB of storage, then you should ensure that the Backup Server has approximately 1140GB of storage.
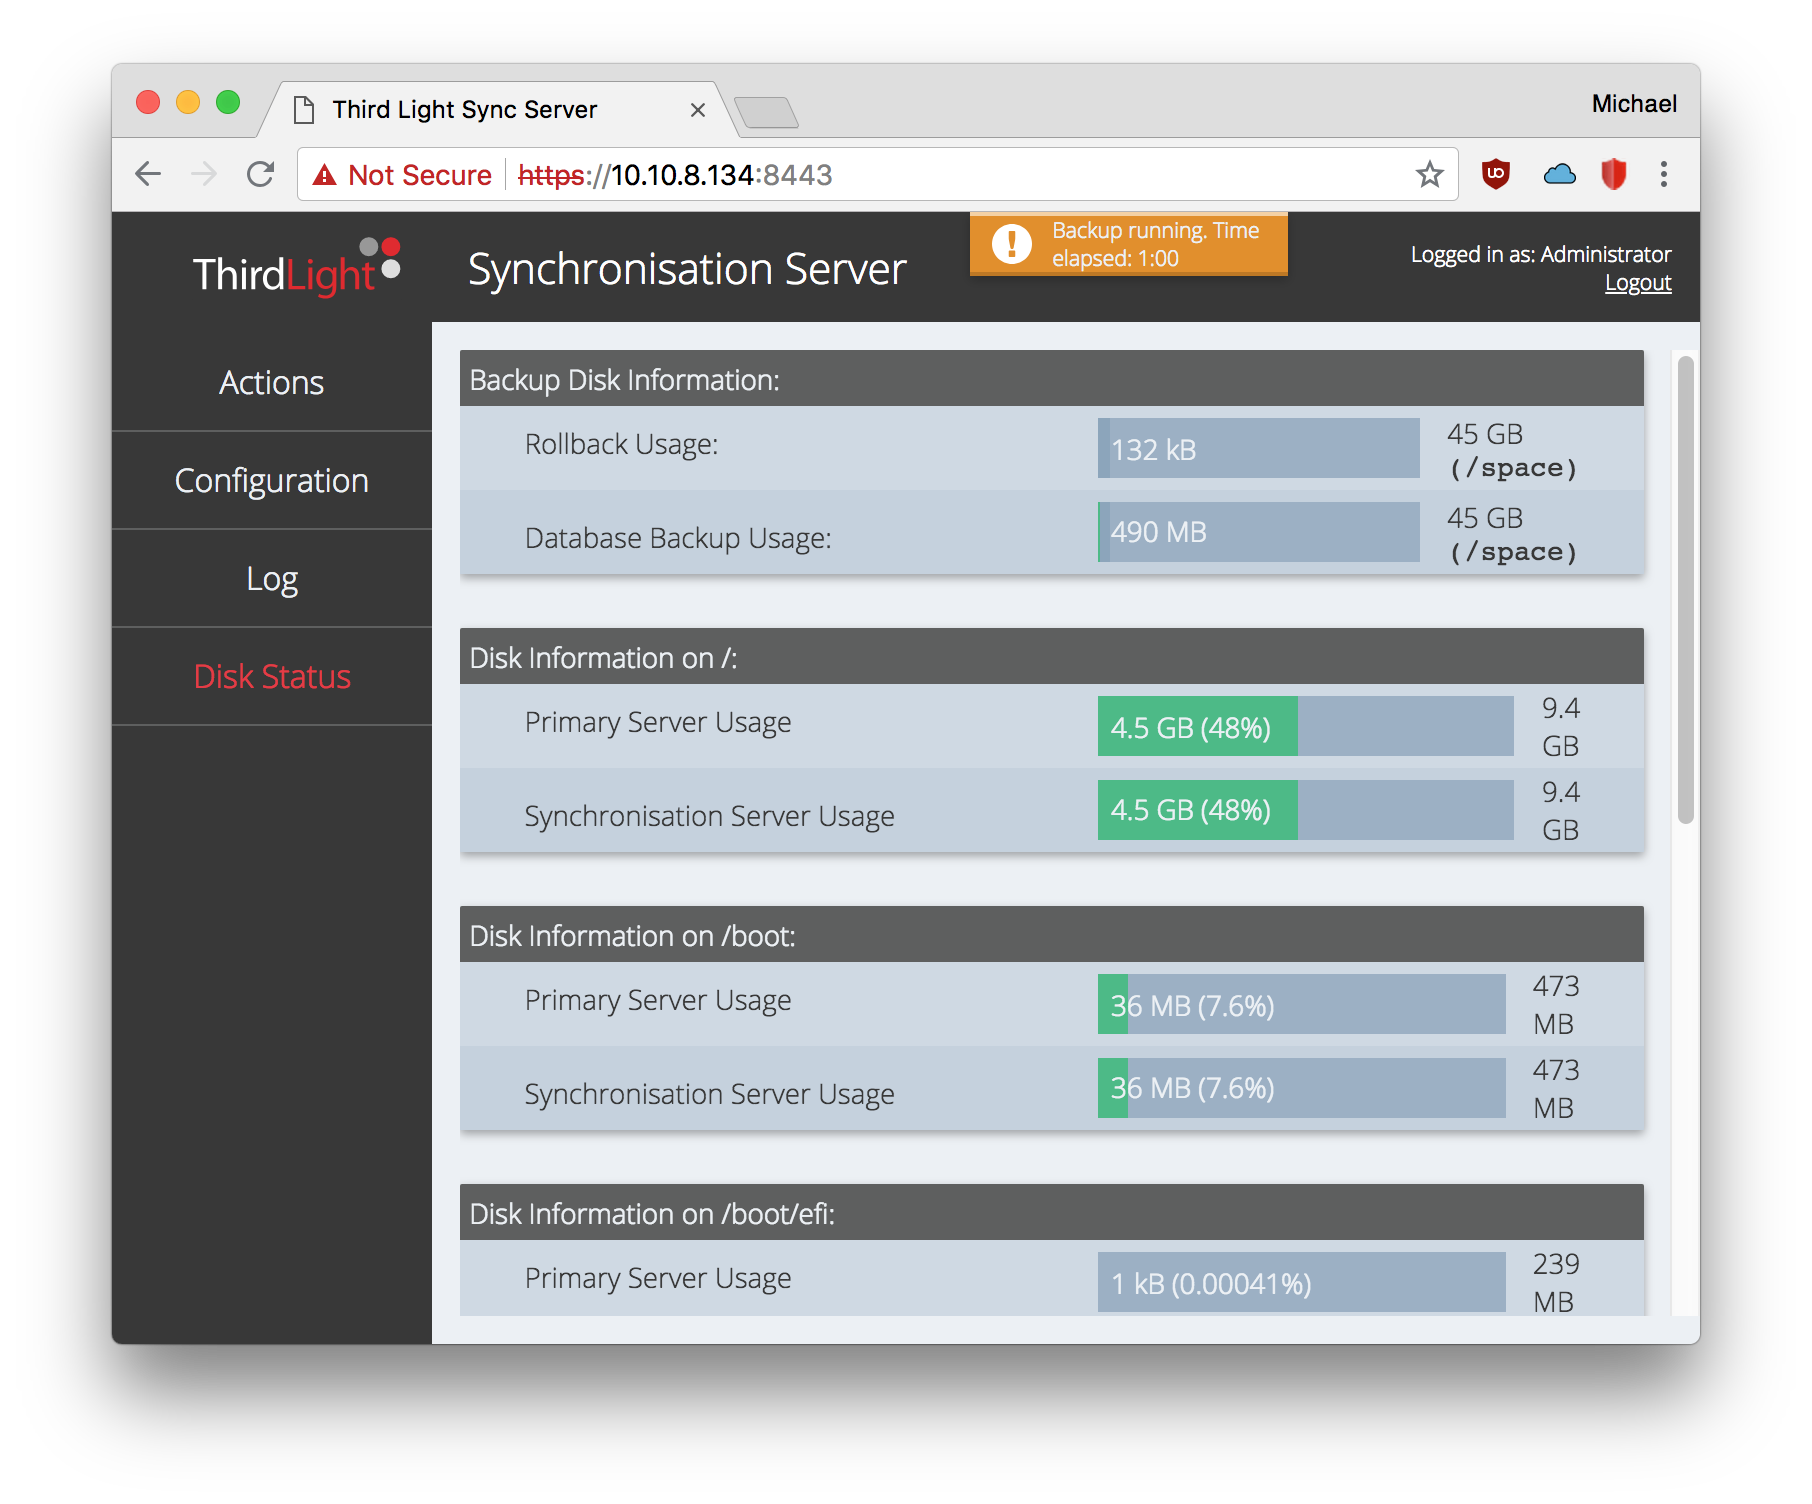
Note: the Disk Status page will not be available immediately after booting your new Backup Server. The information required is gathered shortly after the Backup Server starts up.
Checking the status of the Backup Server
From the Primary Server
The primary server features a status page so that the success of failure of backups can easily be seen:
Configuration > System Administration > Backups
In order that the Backup Server can send a status report to the Primary Server, it must be able to contact chorus-primary on port 443 (HTTPS). An error regarding an 'unexpected status' may be seen if neither of these ports are open.
From the Backup Server
Background Information for Systems Administrators
The following information is supplementary and should not be required except in very specific circumstances. Where possible, use the Backup Server user interface to manage your backups and contact [email protected] before making low-level adjustments.
Configuration Files
The configuration of your Backup Server is in the following file:
/opt/thirdlight/etc/ims-sync.ini
This file is read from the Backup Server user interface, and changes committed from the user interface are written to the configuration file.
The configuration fields are as follows:
IMS_MASTER | The IP address or hostname of chorus-primary. chorus-secondary must be able to contact chorus-primary on ports 22 (ssh) and 443 (HTTPS). |
MAX_GENERATIONS | The number of days of backups to keep. Additional backup generations require more storage. |
DBROOT | Default: /space/db_backups This directory contains the database backup snapshots taken from chorus-primary. Ensure that this location can store the size of your database (/var/lib/mysql on chorus-primary) multiplied by MAX_GENERATIONS. |
ROLLBACKROOT | Default: /space/rollback This is the local directory to use to store data rollbacks. These can be used to incrementally restore the data directories to any of the last MAX_GENERATIONS days. This should be on a large volume, as |
DIR_DATE_FORMAT | Default: %F_%H-%M This is a date format string for GNU date (see date --help). It is used to generate daily directories for backup generations in ROLLBACKROOT and DBROOT. In normal use you should not change this value. |
EXTRA_TOPDIRS | By default, the synchronisation process copies all Third Light directories. You can add additional folders here (relative to /space). |
EXTRA_SPACEDIRS | Optional parameter for additional space[n] directories. Enter as "space2 space3" etc. /space is always included by default. Note that the size and layout of /space directories on the Backup Server must match, or exceed, the Primary Server. |
MYSQL_PASSWORD | The MySQL root password for chorus-primary |
HOTCOPY_DATA_DIR | This is the directory on chorus-primary to which MySQL database snapshots are saved. It defaults to /space/ims/<sitename>/hotcopy, and should not normally need to be changed. |
ERROR_NOTIFY | Default: [email protected] This is the e-mail address that is notified if the backup encounters an error condition (default: [email protected]). You must ensure that email delivery is configured and working (e.g. dpkg-reconfigure exim4-config). |
READ_ONLY_SLAVE | Default: (not set) If the Backup Server uses a read-only mount, replicated by an external process (e.g. NetApp replication), the synchronisations process should not copy data from the master. In this case, set the READ_ONLY_SLAVE option to 1 to perform additional actions on the master, and to prevent attempting to copy data under /space. Do not enable this option in the absence of external replication, as it will disable data copying. |
COMPRESS | Default: (not set) To enable compression on data transfers, set this to a value of 1. This enables gzip compression. This is not usually beneficial as the data being replicated is generally already in a compressed format (e.g. GZip or JPEG files). |
NO_PING | Default: (not set) Set this option if running the sync manually errors with 'Master server not reachable' due to inability to ping chorus-primary from chorus-secondary. |
Running a manual backup from the command line
Occasionally it may be useful to run the backup manually from the command line:
/opt/thirdlight/sbin/sync_server
Roll-Back Files
Roll-back files are stored on the Backup Server. The Roll-back files are located in /space/rollback, and contain a record of changes made each day. These files accumulate with each backup. The roll-back files can be re-integrated with the most recent content to transform the storage on chorus-primary back to an older state. In effect, the roll-back files can be used to undo whatever changes have been made. This is a powerful and useful feature which is achieved with minimal storage overheads, as the roll-back files only record differences.
You will need to have access to the roll-back files for the period you want to undo. To check which roll-back files are available, go to /space/rollback and use ls -1tr to list the contents in reverse order. The last directory will be the most recent roll-back. The date and time is encoded in the folder name.
2017-05-09_02-45 3 days ago
2017-05-10_02-45 2 days ago
2017-05-11_02-45 1 day ago
You can restore the any number of roll-backs provided they are applied in sequence (e.g. to roll back three days, execute the rollback scripts from today, then yesterday, then two days ago). You can only apply roll-back files in strict reverse order. To restore 1 day, in this example we would use the 2017-05-11_02-45 roll-back files. Inside this directory are ready-made Shell scripts (.sh extension) which automate the restoration of that roll-back, to save you time.
On chorus-primary, as root, run the commands that end in '.sh'. Please note that you may not necessarily see space2_ims.sh, space3_ims.sh depending upon how may data stores are configured.
/space/rollback/2017-05-11_02-45/space_ims.sh
/space/rollback/2017-05-11_02-45/space_archives.sh
/space/rollback/2017-05-11_02-45/space2_ims.sh
Each script issues the commands necessary to restore the roll-back. Depending on the size of the roll-back and the size of your Third Light site, the ims.sh operation may take a while to complete while the other operations will be fast.
Once the process of re-integrating the roll-backs has completed, you must restore the database backup for the same point in time.
We provide a script called restore.sh which will inspect and recover your Third Light site, provided that the /space backup is a complete and consistent backup.
To find restore.sh, go to /space/ims/sitename. If you are unsure what sitename has been used, run this command:
ls /space/ims/
You will see a themefiles directory and at least one sitename.
Next run /space/ims/sitename/last-good/restore.sh.
You will be asked to confirm that you wish to proceed, and the date of the backup will be displayed:
This process will restore the database and system state from the backup taken on 2012-03-06_00-24
This restore does not include file content - please ensure that all datastores are mounted or restored
Any existing database or configuration will be replaced with the backup.
Do you wish to continue? (y/N)
Depending on the state of your server, you may see packages downloaded, being configured or replaced. Once this process is complete you will see this message:
Your Chorus server has been restored successfully.
The Third Light site is now ready to use. If you do not see this message, there may be more complex underlying dependencies or changes required. It is usually best to refer such problems back to Third Light. Please ask for help by emailing [email protected].
Syslog Integration
The Backup Server logs progress and events to syslog as ims-sync, using the local6 facility. If you have a central syslog server, you may wish to configure the system to send these messages there.
Third Light servers use rsyslog, which is simple to configure for remote logging. For example, the following will forward all log events to syslog.mydomain.com UDP port 514:
cat > /etc/rsyslog.d/ims-sync.conf <<'EOF'
$ModLoad imuxsock

$ModLoad imklog

# UDP forwarding mode
local6.* @syslog.mydomain.com:514

EOF

/etc/init.d/rsyslog reload
Severity levels of error, warning, notice and info are used.
- error: The sync/restore process failed
- warning: Events such as sync being disabled, another process already running, or a diagnostic disabled by configuration
- notice: Successful completion
- info: Additional information about progress or active tasks
